差不多每天都有幾個這樣的警告記錄,原來一些軟件會自動連線到軟件本身公司的網站,可能是要查更新資料,也可能不知是做甚麼,我一般都會自訂防火牆禁止這些連線,就這樣他們不能連線時就會出現這些警告,所以不理他們也沒有問題。
當然也有可能是網絡問題,以下連結有提供一些解決方法。
http://www.eventid.net/display.asp?eventid=1014&eventno=10623&source=DNS%20Client%20Events&phase=
2011年11月13日星期日

免費 USB 記憶加密軟件
現在不可免要用到 USB 記憶,通所 USB 手指都會跟加密軟件,但記憶咭就不一定會,在網上找了一會,通所都會介紹 TrueCrypt 這隻開放程式,但望上去使用好像幾煩。再找到一隻好像較方便的 USB Flash Security v2.1.1,但它一定要加密全隻記憶咭,不能保留部份作公用儲存,最後找到了這隻 Rohos Mini,雖然免費版只可以建立不超過2G的加密儲存,但一般也夠用了。


http://www.rohos.com/products/rohos-mini-drive/
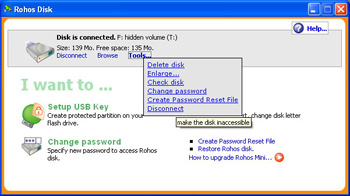
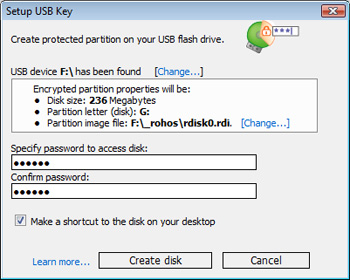
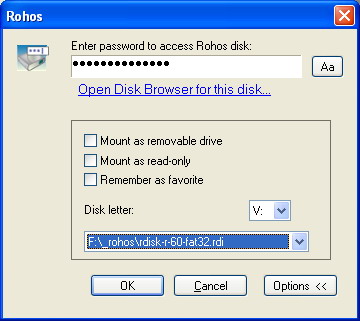
http://www.rohos.com/products/rohos-mini-drive/
2011年11月11日星期五
Windows 7/8/10 手動強制安裝 Syntek Webcam Driver
最近升上 Windows 10 遇到同樣問題,這幾年前的驅動居然也合用!
留意內建是沒有 D-MAX 驅動,所以要先從華碩支援網頁下載。
之前說 Windows 7 對舊週邊硬件不支援,其實應該是二三線牌子硬件售後服務不足,沒有提供新驅動支援,一些內建同樣零件的大牌子廠商週邊硬件,就提供了 Windows 7 的驅動更新 (所以大牌子有時都貴得有道理)。雖然使用了相同零件,但一般情形下不同牌子的硬件 Windows 都不會自動識別安裝,需要手動強制安裝驅動。
原有的 Webcam 已找不到牌子名,只知道是使用 Syntek dc-112x 方案的零件,網上也找不到新驅動下載,但查到很多手提電腦都會用到 Syntek 或叫的 D-MAX (找 Syntek 代工?) 做 Webcam,而會支援 Windows 7 的最早只有 dc-1135,於是也安裝來試試,步驟如下;
1. 插入 Webcam,這時 Windows 會自動找驅動安裝但不成功,只要關閉以下視窗便可

2. 進入裝置管理員會找到未安裝完成的裝置,如下圖 USB 2.0 Video

3. 以滑鼠右鍵點擊裝置並選擇更新驅動程式,出現下圖後點擊選擇瀏覽電腦上的驅動程式軟體

4. 出現下圖後點擊選擇讓我從電腦上的裝置驅動程式清單中挑選

5. 在清單中選擇影像裝置

6. 如下圖選擇你要的驅動,我的是 D-MAX, (STK1135) USB2.0 1.3M WebCam

7. 出現警告點擊"是"繼續安裝

8. 成功安裝(留意就算安裝到也未必用到,可用 WebCam 應用軟件確定驅動支援你的硬件

9. 查看驅動版本如下

其實我不知道這個 D-MAX 驅動是之前不經意的加上還是 Windows 7 內建,若在內建驅動找不到可從網上找,如華碩支援網址,下載最新 D-MAX "Version V7.11.719.002" Windows 7 驅動並先解壓,再跟以上步驟安裝,到步驟6點擊從磁片安裝,再選擇你剛解壓的驅動資料夾位置,便可跟原來步驟安裝。
P.S. 華碩有新舊版驅動,我還是再用之前的版本,新版就不知可不可用了。
留意內建是沒有 D-MAX 驅動,所以要先從華碩支援網頁下載。
之前說 Windows 7 對舊週邊硬件不支援,其實應該是二三線牌子硬件售後服務不足,沒有提供新驅動支援,一些內建同樣零件的大牌子廠商週邊硬件,就提供了 Windows 7 的驅動更新 (所以大牌子有時都貴得有道理)。雖然使用了相同零件,但一般情形下不同牌子的硬件 Windows 都不會自動識別安裝,需要手動強制安裝驅動。
原有的 Webcam 已找不到牌子名,只知道是使用 Syntek dc-112x 方案的零件,網上也找不到新驅動下載,但查到很多手提電腦都會用到 Syntek 或叫的 D-MAX (找 Syntek 代工?) 做 Webcam,而會支援 Windows 7 的最早只有 dc-1135,於是也安裝來試試,步驟如下;
1. 插入 Webcam,這時 Windows 會自動找驅動安裝但不成功,只要關閉以下視窗便可

2. 進入裝置管理員會找到未安裝完成的裝置,如下圖 USB 2.0 Video

3. 以滑鼠右鍵點擊裝置並選擇更新驅動程式,出現下圖後點擊選擇瀏覽電腦上的驅動程式軟體

4. 出現下圖後點擊選擇讓我從電腦上的裝置驅動程式清單中挑選

5. 在清單中選擇影像裝置

6. 如下圖選擇你要的驅動,我的是 D-MAX, (STK1135) USB2.0 1.3M WebCam

7. 出現警告點擊"是"繼續安裝

8. 成功安裝(留意就算安裝到也未必用到,可用 WebCam 應用軟件確定驅動支援你的硬件

9. 查看驅動版本如下

其實我不知道這個 D-MAX 驅動是之前不經意的加上還是 Windows 7 內建,若在內建驅動找不到可從網上找,如華碩支援網址,下載最新 D-MAX "Version V7.11.719.002" Windows 7 驅動並先解壓,再跟以上步驟安裝,到步驟6點擊從磁片安裝,再選擇你剛解壓的驅動資料夾位置,便可跟原來步驟安裝。
P.S. 華碩有新舊版驅動,我還是再用之前的版本,新版就不知可不可用了。
2011年11月10日星期四
Windows 系統管理事件識別碼413來源 taskscheduler
突然在事件檢視器看到這個錯誤,再去工作排程器發現所有排程工作不見了,在網上查了一下原來 CCleaner 在 Windows 7 x64 下有 bug,若清理勾選"IIS日誌檔"時便會出現這問題,似乎最新版還未有解決,只好用 Windows 本身的還原功能,把電腦還原到未有這錯誤前的日期,才可回復所有排程工作。
2011年11月5日星期六
Yahoo Mail POP3 及 SMTP 設定
現在的 Web Mail 十分方便,只要可上網就可以收發及看電郵,但自己電腦上沒有副本,Web Mail 戶口若出現問題或不小心刪除電郵便可能取不回,所以用電郵軟件可能保險一點。
好在 Yahoo Mail 有提供免費的 POP3 及 SMTP 服務,只要用以下參數設定電郵軟件便可:
POP3 內送郵件伺服器:pop.mail.yahoo.com
若標準設定不能連接伺服器,可以嘗試使用 SSL 及 Port 995
SMTP 外寄郵件伺服器:smtp.mail.yahoo.com
需要登入及使用 SSL 及 port 465
內送及外寄登入資訊跟原Yahoo戶口脹號及密碼便可。
Reference:
http://www.emailquestions.com/yahoo-mail/8141-what-pop3-settings-yahoo-mail.html
好在 Yahoo Mail 有提供免費的 POP3 及 SMTP 服務,只要用以下參數設定電郵軟件便可:
POP3 內送郵件伺服器:pop.mail.yahoo.com
若標準設定不能連接伺服器,可以嘗試使用 SSL 及 Port 995
SMTP 外寄郵件伺服器:smtp.mail.yahoo.com
需要登入及使用 SSL 及 port 465
內送及外寄登入資訊跟原Yahoo戶口脹號及密碼便可。
Reference:
http://www.emailquestions.com/yahoo-mail/8141-what-pop3-settings-yahoo-mail.html
2011年10月17日星期一
共用打印機要開內置的 Windows Firewall Service
昨天初時設定共用打印機時出現錯誤,原來提供共用設備要開 Windows 內置的 Windows Firewall Service,一向是用 Comodo 做防火牆而沒有開啟 Windows Firewall,開啟 Windows Firewall 服務後便沒問題了。
2011年10月16日星期日
解決光碟及記憶咭不能自動播放的問題
之前才說可以嘗試以兼容模式安裝舊程式,但今天安裝舊版 ACDSee 時就出現問題,ACDSee 的裝置偵測程式跟 Windows 7 內建的自動播放功能出現相撞,使光碟及記憶咭不能自動播放,就算不啟動裝置偵測程式,記憶咭也不能自動播放,最後在以下網站找到解決方法。
http://www.mydigitallife.info/fix-windows-7-autoplay-dialog-box-missing-or-not-appear-display-and-pop-up/
要留意的是記憶咭可能是因其他原因而不能自動播放,懶點省去翻譯就直接節錄上文提供其中的解決方法;
"4. Ensure that NoDriveTypeAutoRun and/or NoDriveAutoRun policy registry value data is correct
For most users, the main culprit of AutoPlay not functioning is NoDriveTypeAutoRun registry key, where its value has been modified unknowingly. Some third-party software program, especially disc imaging or image editing program such as Nero, PowerISO, MagicISO, and even some other application programs such as Rhapsody and VMWare virtualization products intentionally disable AutoPlay feature by changing system’s policy to avoid conflict with the program. The problem is after uninstalling the software, the AutoPlay feature does not re-enable or restore. User has to rely on trick below to re-enable the AutoPlay.
If you’re facing the drive won’t Auto Play or Auto Run issue after installing certain software, try to uninstall the software to see if it fixes the problem. Better still if it’s possible to roll back the system using System Restore to earlier Restore Point when the software is not yet installed.
NoDriveTypeAutoRun registry key is used by Group Policy to configure whether to disable the Autoplay feature on all drives of the type specified. To check this setting, run Registry Editor (regedit), and navigate to the following registry key:
HKEY_LOCAL_MACHINE\Software\Microsoft\Windows\CurrentVersion\Policies\Explorer
or (note that above registry value, if exists, will always supersede the below user-specific key),
HKEY_CURRENT_USER\Software\Microsoft\Windows\CurrentVersion\Policies\Explorer
Locate the NoDriveTypeAutoRun registry entry on the right pane. The registry key is in DWORD hexadecimal value, which each bit determines which type of drive to disable or enable AutoPlay feature. There are many possible value for NoDriveTypeAutoRun, some possible NoDriveTypeAutoRun registry value data includes:
0×00000000 (0) enable all AutoPlay and AutoRun.
0×00000080 (128) disable AutoPlay on unknown reserved file type.
0×00000091 (145) default in Windows Vista and Windows 7.
0×00000095 (149) default in Windows XP.
0×000000B5 (181) disable AutoRun on CD-ROM drives, plus default unknown drive, removable drive (meant for floppy or ZIP), network drive and reserved drive type.
0×000000FF (255) disable AutoRun/AutoPlay on all drive types.
Thus, if the NoDriveTypeAutoRun registry value data is set to 0x000000B5 (181) or 0x000000FF (255), which disables AutoRun/AutoPlay on most or all drive types, the AutoPlay won't work when a drive is connected...."
http://www.mydigitallife.info/fix-windows-7-autoplay-dialog-box-missing-or-not-appear-display-and-pop-up/
要留意的是記憶咭可能是因其他原因而不能自動播放,懶點省去翻譯就直接節錄上文提供其中的解決方法;
"4. Ensure that NoDriveTypeAutoRun and/or NoDriveAutoRun policy registry value data is correct
For most users, the main culprit of AutoPlay not functioning is NoDriveTypeAutoRun registry key, where its value has been modified unknowingly. Some third-party software program, especially disc imaging or image editing program such as Nero, PowerISO, MagicISO, and even some other application programs such as Rhapsody and VMWare virtualization products intentionally disable AutoPlay feature by changing system’s policy to avoid conflict with the program. The problem is after uninstalling the software, the AutoPlay feature does not re-enable or restore. User has to rely on trick below to re-enable the AutoPlay.
If you’re facing the drive won’t Auto Play or Auto Run issue after installing certain software, try to uninstall the software to see if it fixes the problem. Better still if it’s possible to roll back the system using System Restore to earlier Restore Point when the software is not yet installed.
NoDriveTypeAutoRun registry key is used by Group Policy to configure whether to disable the Autoplay feature on all drives of the type specified. To check this setting, run Registry Editor (regedit), and navigate to the following registry key:
HKEY_LOCAL_MACHINE\Software\Microsoft\Windows\CurrentVersion\Policies\Explorer
or (note that above registry value, if exists, will always supersede the below user-specific key),
HKEY_CURRENT_USER\Software\Microsoft\Windows\CurrentVersion\Policies\Explorer
Locate the NoDriveTypeAutoRun registry entry on the right pane. The registry key is in DWORD hexadecimal value, which each bit determines which type of drive to disable or enable AutoPlay feature. There are many possible value for NoDriveTypeAutoRun, some possible NoDriveTypeAutoRun registry value data includes:
0×00000000 (0) enable all AutoPlay and AutoRun.
0×00000080 (128) disable AutoPlay on unknown reserved file type.
0×00000091 (145) default in Windows Vista and Windows 7.
0×00000095 (149) default in Windows XP.
0×000000B5 (181) disable AutoRun on CD-ROM drives, plus default unknown drive, removable drive (meant for floppy or ZIP), network drive and reserved drive type.
0×000000FF (255) disable AutoRun/AutoPlay on all drive types.
Thus, if the NoDriveTypeAutoRun registry value data is set to 0x000000B5 (181) or 0x000000FF (255), which disables AutoRun/AutoPlay on most or all drive types, the AutoPlay won't work when a drive is connected...."
2011年10月15日星期六
以兼容模式安裝舊程式
轉了用 Windows 7 後,一些版本較舊原本只支援 XP 或 Vista 的程式可能會不能正常安裝執行,這時可以試試這個辦法。
右擊安裝檔,選擇"內容">"相容性">在相容模式下鈎選"以相容模式執行這個程式:">再選擇這個程式能支援的 Windows 版本>按"確定"後以正常方法進行安裝便可。

右擊安裝檔,選擇"內容">"相容性">在相容模式下鈎選"以相容模式執行這個程式:">再選擇這個程式能支援的 Windows 版本>按"確定"後以正常方法進行安裝便可。

訂閱:
文章 (Atom)